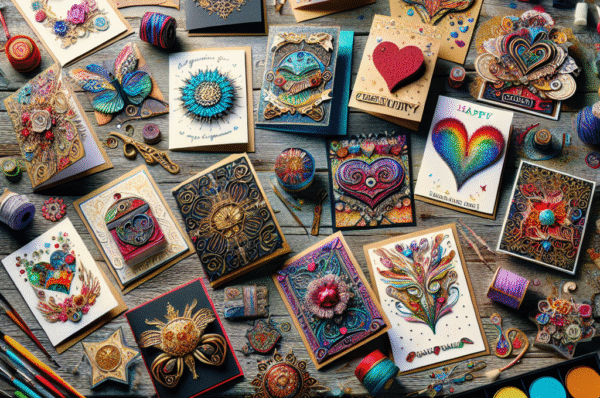
In an age dominated by quick, digital communication, there’s something profoundly personal about sending and receiving handwritten cards. Custom cards are more than just pieces of paper; they are heartfelt messages, conveys of emotions, and tokens of memories. Crafting your custom cards allows you to express your unique creativity, celebrate special occasions, or even simply say “I’m thinking of you.” This ultimate guide will help you unlock your creativity and make stunning custom cards that leave lasting impressions.
Types of Custom Cards
1. Greeting Cards
Perfect for birthdays, anniversaries, or just because! These cards often come with uplifting messages and gorgeous designs that can be tailored to the recipient’s preferences.
2. Thank-You Cards
Gratitude is always in style! Thank-you cards can be customized to reflect the occasion for which you are grateful, whether it’s a wedding gift, a kind gesture, or support during tough times.
3. Holiday Cards
From Christmas to Halloween, holiday cards bring people together. Customize them to reflect your personality or family traditions.
4. Invitations
Planning a party or an event? Custom invitations can set the tone and excitement for your event while giving your guests a sneak peek into what to expect.
5. Postcards
Capture beautiful places or special moments with custom postcards. These can be great for travel memories, thank-you notes, or just to share with friends.
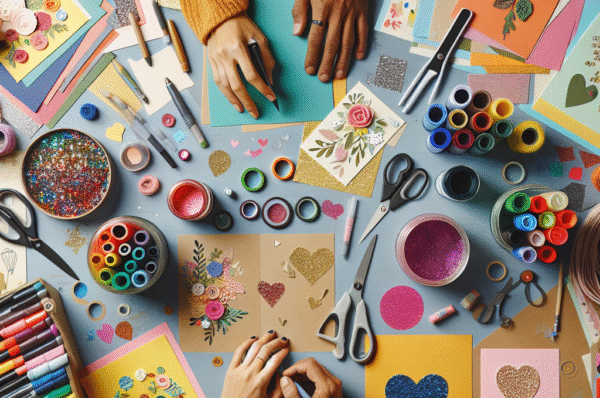
Getting Started: Supplies You’ll Need
To create your custom cards, you don’t need an extensive toolkit. Here’s a basic list of supplies:
- Cardstock: Sturdy and perfect for printing or handcrafting.
- Envelopes: Choose colors and sizes that match your card design.
- Markers/Pens: Use fine-tipped markers or brushes for writing and embellishing.
- Stickers/Embellishments: Add textures and layers for a more dynamic look.
- Stamps: Incorporate designs that resonate with the card’s theme.
- Cutting Tools: Scissors or paper cutters for precision.
- Adhesives: Glue sticks, double-sided tape, or washi tape to attach elements.
Steps to Create Custom Cards
1. Design Your Layout
Start by sketching a layout. Decide on the size and orientation of your card. Think about the design elements you’ll incorporate, such as images, text placement, and any embellishments.
2. Choose Your Color Palette
Color can evoke emotions and set the mood. Choose a color palette that resonates with the occasion and the recipient.
3. Incorporate Personal Touches
Your custom card should reflect the recipient’s personality or your shared experiences. Consider including photos, quotes, or inside jokes.
4. Write Meaningful Messages
A handwritten note adds a personal touch. Spend time crafting your message—consider what you want to express, whether it’s love, congratulations, or appreciation.
5. Add Decorative Elements
Enhance your design with stickers, drawings, or stamped impressions. Layering different textures (like fabric or ribbon) can make your card unique.
6. Final Touches
Before sending, check for any smudges or mistakes. Ensure your envelope complements your card. You can also seal it with a sticker or wax seal for that added touch.
Tips for Enhancing Your Card-Making Experience
- Stay Organized: Keep your materials sorted and in one place, making it easier to access supplies when inspiration strikes.
- Experiment: Don’t be afraid to try new techniques or styles. Hand lettering, embossing, or digital designs can elevate your cards.
- Join a Community: Engage with fellow card makers through workshops or social media groups for inspiration and support.
- Document Your Work: Take photos of your creations. Sharing your custom cards online can serve as an inspiration for others.
Conclusion
Crafting custom cards is not just about creating a physical object; it’s about embracing your creativity and fostering connections with the people who mean the most to you. Whether it’s for celebrations or simple gestures of kindness, personalized cards can bring joy and warmth in a world that often feels rushed. So, gather your supplies, unleash your imagination, and start making cards that tell your story, one heartfelt note at a time!